Quick Reference For WIZ-Cam
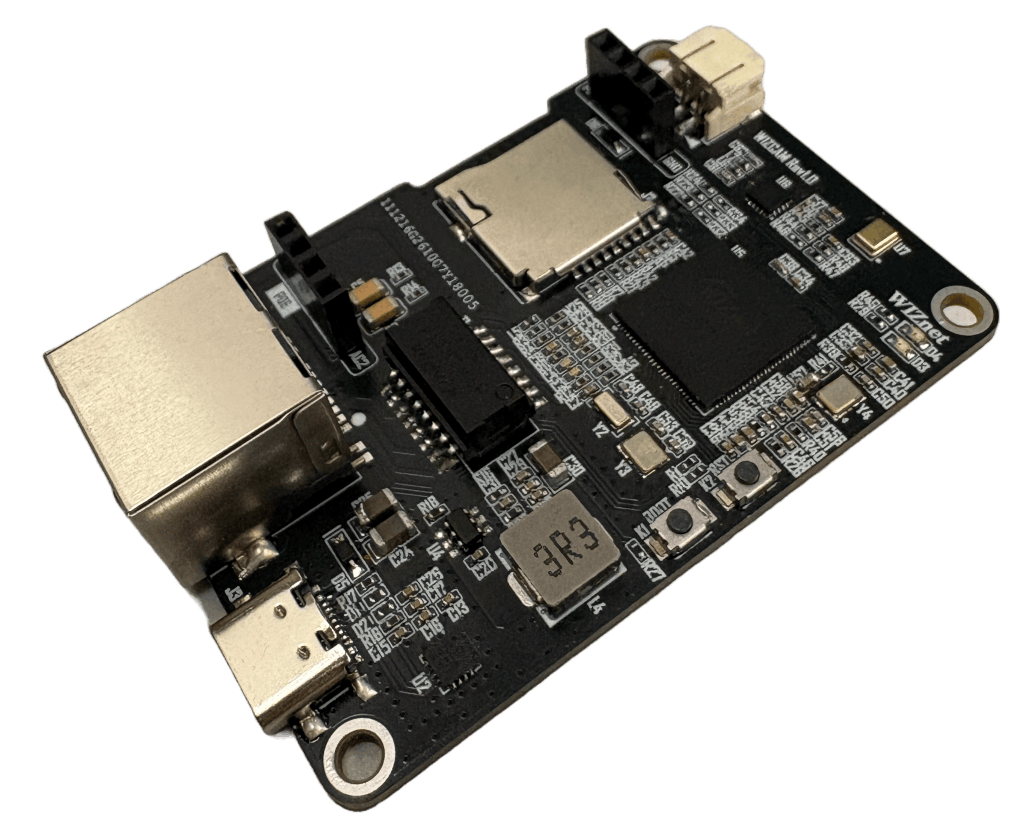
WIZ-Cam is a MicroPython-powered camera board built on WIZnet’s W55MH32 chip, with an OV2640 image sensor and an ICS-43434 I2S microphone. It streams video over Ethernet as HTTP MJPEG, or as RTSP/RTP with audio.
Purchase link: WIZ-Cam
Download Hex file: WIZ-Cam hex
Firmware Information:
MicroPython version |
V 1.27.0 |
Release date |
2026/11/02 |
Release notes |
First release. |
Pinout
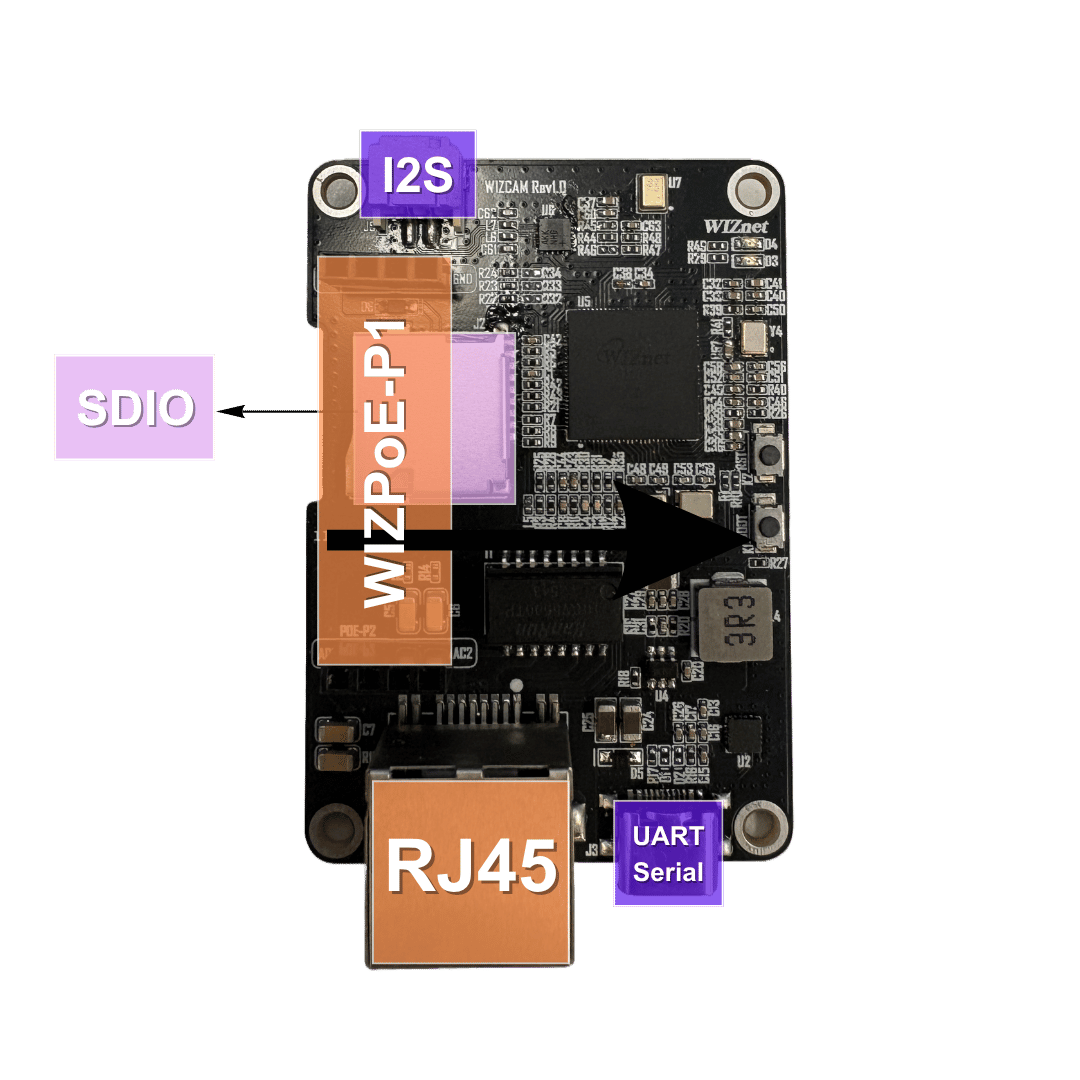
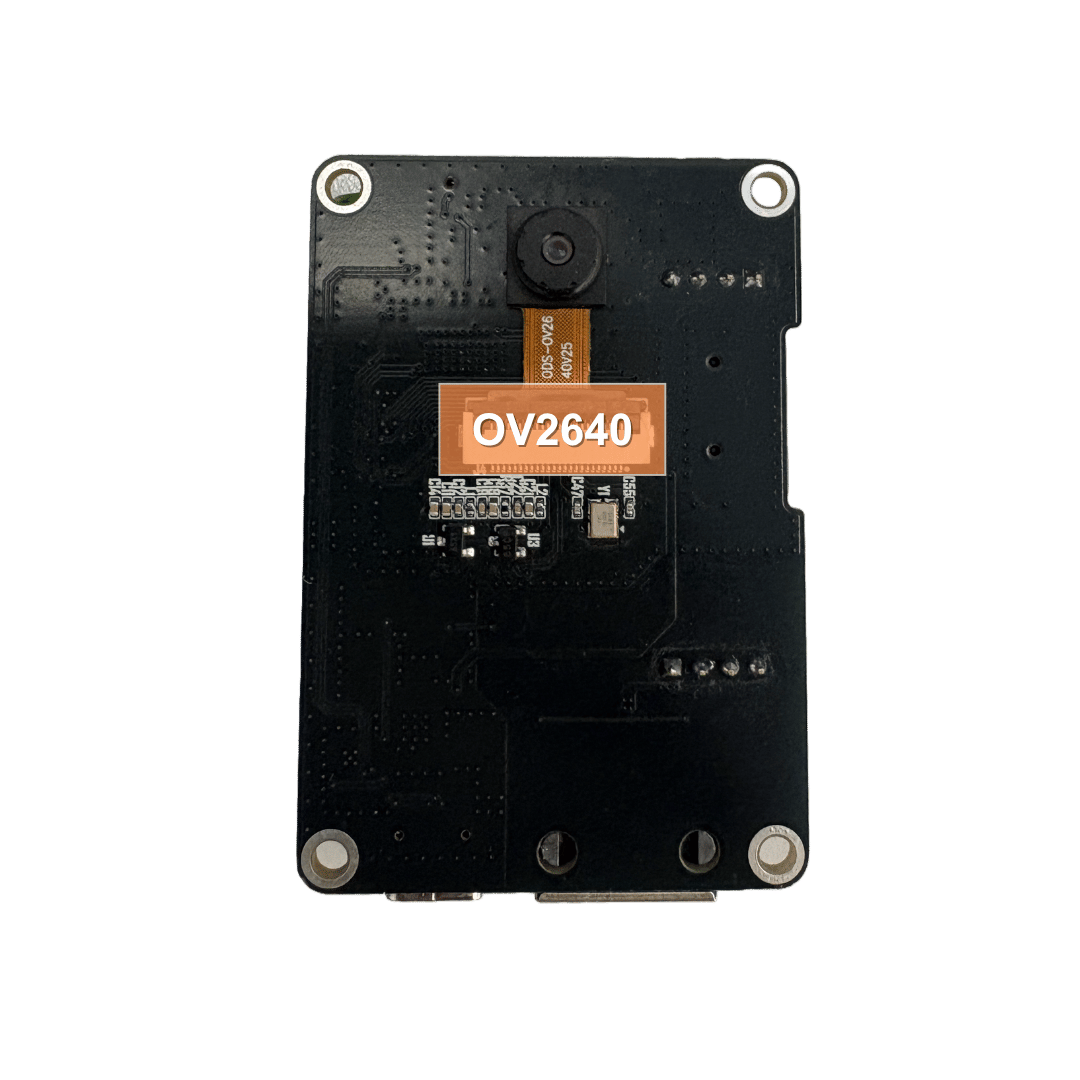
The table below shows the pins used by the camera and the audio devices on the WIZ-Cam.
Signal |
Pin |
Role |
|---|---|---|
OV2640 D0-D7 |
|
Pixel data |
OV2640 PCLK |
|
TIM1_ETR |
OV2640 HREF |
|
TIM1_CH1 |
OV2640 VSYNC |
|
Frame start and end |
OV2640 SCCB (I2C) |
|
Sensor configuration |
Microphone / amplifier I2S |
|
I2S3 |
Frozen Modules
🧊 Click to expand – full list of frozen modules
Basic Setup
Important
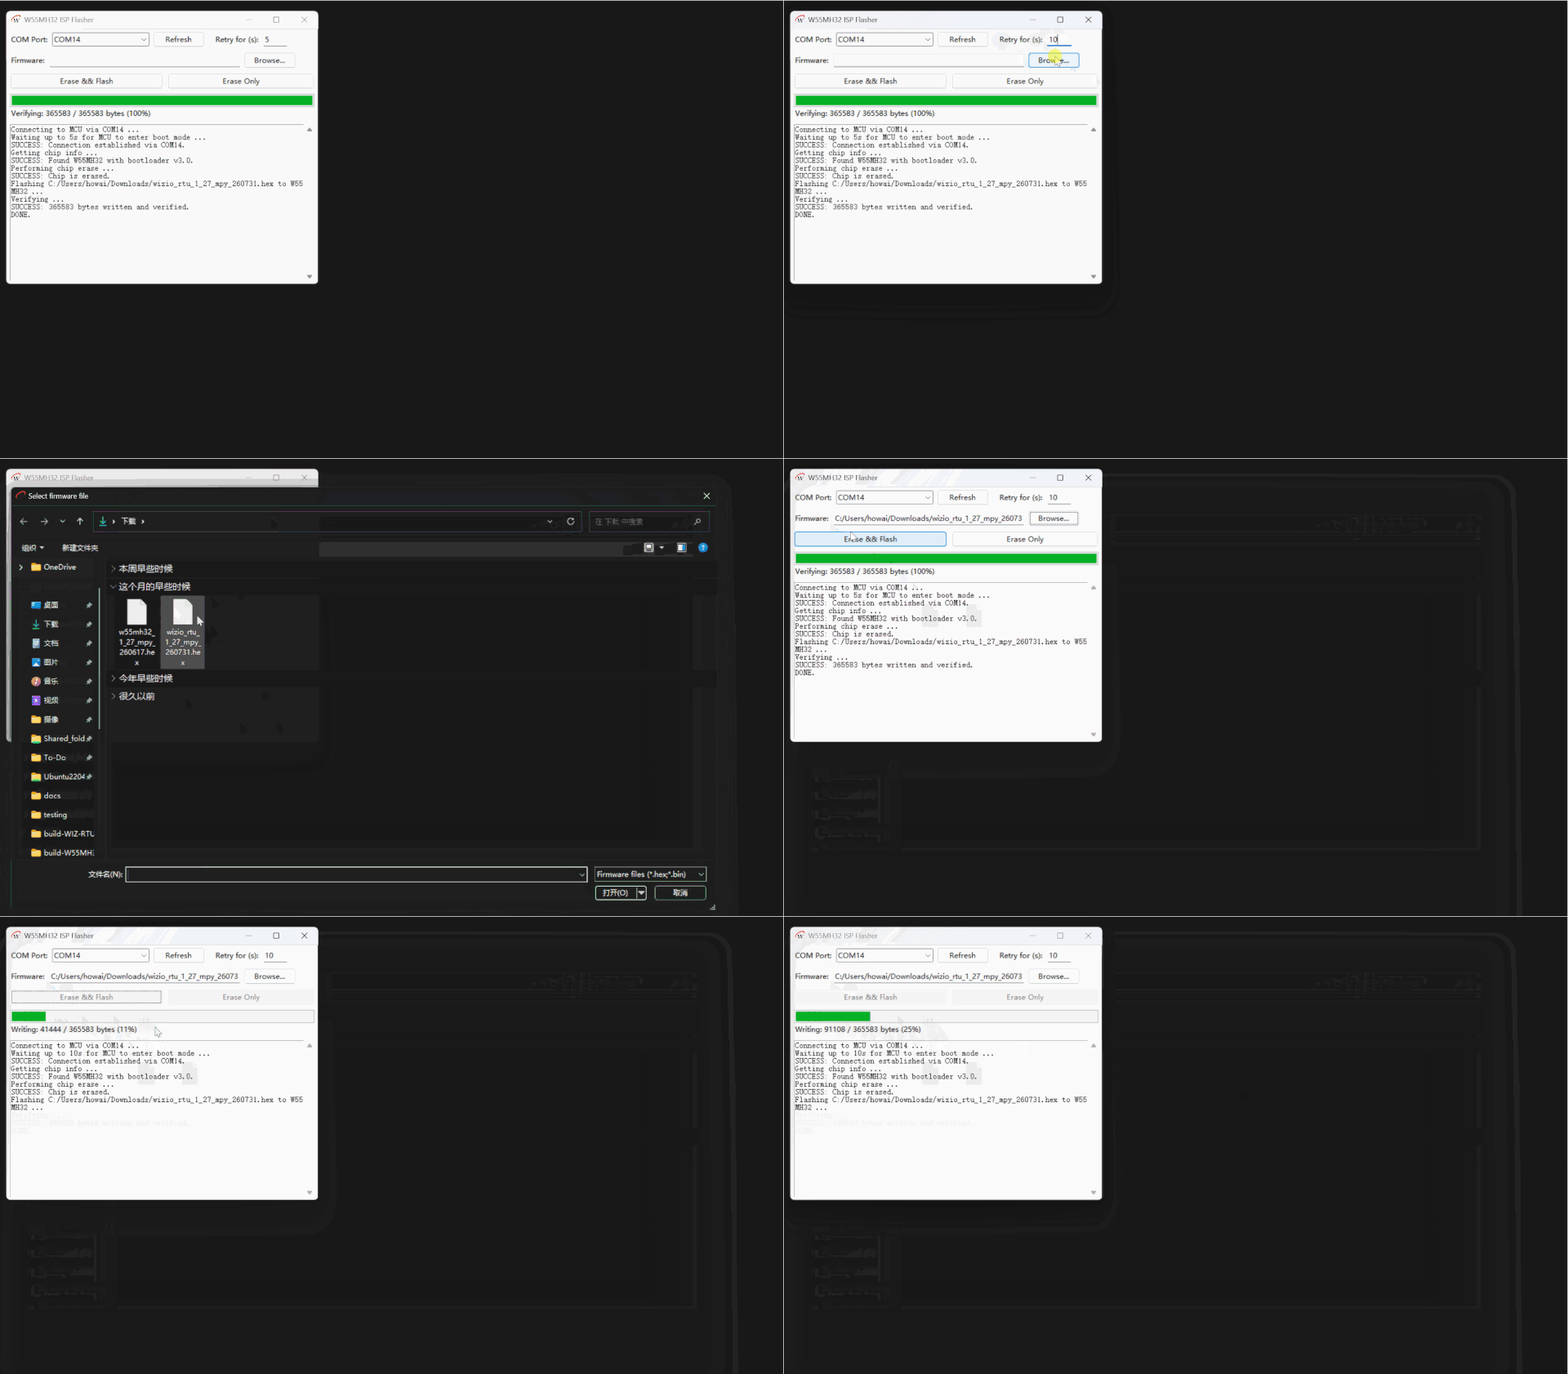
You will need WizISP Tool before using MicroPython on this board.
Unzip and open WizISP.exe.
Select the correct COM port and choose the firmware file you want to flash.
Click Erase && Flash.
To enter boot mode, press and hold the BOOT0 button first, then press the RESET button.
Once flashing is finished, open your preferred MicroPython REPL tool. You should see the MicroPython terminal start successfully. You can verify the firmware by running:
print("hello world!")
Camera Application
Important
Visit WIZ-Cam for the source code of this project.
The WIZ-Cam application streams the camera over Ethernet. Set CAM_TYPE in config.py to choose the stream, then
reset the board. The serial output prints the address to connect to.
Stream |
|
Open with |
|---|---|---|
HTTP MJPEG (video only) |
|
A web browser, at |
RTSP/RTP (video and audio) |
|
VLC or ffplay, at |
Camera settings such as resolution and JPEG quality can be changed while streaming, through JSON messages on UDP
port 5000.
Specification
Image sensor |
OV2640, 8-bit DVP, JPEG output |
Microphone |
ICS-43434 |
Speaker amplifier |
MAX98357A |
Video formats |
JPEG, from 176x144 up to 1280x960 |
Audio format |
8 kHz, 16-bit, mono |
Getting Started
Files
The application is split into a few modules. They are kept as source under lib/ and precompiled to .mpy for the
board:
File |
Purpose |
|---|---|
|
Entry point. Starts the HTTP or the RTSP server, depending on |
|
Board settings: transport, network, debug output. |
|
|
|
ICS-43434 capture, RTP audio packets and MAX98357A playback. |
|
RTSP handshake and the two RTP sockets. |
|
UDP command server for live camera settings. |
|
The sensor setting functions that |
|
Sensor register tables for each resolution. |
|
Test script for the HTTP stream. Runs HTTP directly, without |
|
Test script for the RTSP stream. Runs RTSP directly, without |
If you change anything under lib/, rebuild the .mpy file with mpy-cross:
mpy-cross -march=armv7m -o _ov2640.mpy lib/_ov2640.py
-march=armv7m is required: several functions use the @micropython.viper and @micropython.native emitters
and will not compile without it.
Setup
Copy the
.mpyfiles,main.pyandconfig.pyto the board’s filesystem.Run
i2c_test.pyonce on new hardware. If it does not report the OV2640’s product ID, nothing else will work.Edit
config.pyfor your network and the transport you want (see below).Reset the board and watch the serial output. It prints the address to connect to.
config.py
Key |
Meaning |
|---|---|
|
|
|
Sensor module to import, as |
|
|
|
Use DHCP, falling back to the static address |
|
Static IP address, subnet mask, gateway and DNS |
Leave DEBUG = False for normal use. Debug reports are printed between frames, but each print over the serial
console still takes milliseconds.
Ports
Service |
Port |
Protocol |
|---|---|---|
HTTP MJPEG stream |
80 |
TCP |
RTSP control |
554 |
TCP |
RTP video |
6100 |
UDP |
RTP audio |
6102 |
UDP |
Camera settings |
5000 |
UDP |
Audio to the speaker (open only in speaker mode) |
6000 |
UDP |
Using the HTTP Stream
Set CAM_TYPE = 0 in config.py, reset the board, then open the board’s address in a web browser:
http://<board-ip>/
The board replies with multipart/x-mixed-replace, which browsers show as a live MJPEG video. The HTTP stream
carries video only and serves one client at a time.
Using the RTSP Stream
Set CAM_TYPE = 1 in config.py, reset the board, then open the stream in VLC or ffplay:
vlc rtsp://<board-ip>:554/
ffplay -i rtsp://<board-ip>:554/
In VLC you can also use Media > Open Network Stream and paste the same URL.
The stream has two tracks:
Video: RTP/JPEG (payload type 26).
Audio: 8 kHz mono, 16-bit PCM (L16, payload type 96).
Important
WIZ-Cam sends RTP over UDP only. A client that asks for RTP over TCP (Transport: RTP/AVP/TCP;interleaved=0-1)
gets 461 Unsupported Transport, and most clients then retry over UDP. A few Windows viewers only support TCP and
will fail to play.
A client running inside WSL cannot receive the stream: the RTSP handshake works because WSL2 forwards outgoing TCP, but the returning UDP packets arrive at the Windows host. Run the player on Windows instead.
Playing Audio on the Speaker
In RTSP mode, the board can play audio sent from your PC through the on-board amplifier. Playback isn’t available in HTTP mode.
The easiest way is the REC button in the configuration tool, which sends your PC microphone to the board. Connect the tool to the board’s configuration socket first, because that is how the board is switched to the speaker.
The microphone and the amplifier share one I2S block, so only one can run at a time. Switch between them with a message to the camera settings port, UDP 5000:
{"audio": 1}
{"audio": 0}
1 selects the speaker and 0 selects the microphone. While the speaker is on, the RTSP audio track carries silence
and video keeps streaming. Each new RTSP PLAY starts on the microphone.
To send audio from your own program, send one 322-byte UDP packet to port 6000 every 20 ms:
Offset |
Size |
Field |
|---|---|---|
0 |
2 bytes |
Sequence number, unsigned, big-endian |
2 |
320 bytes |
160 samples of 8 kHz mono audio, signed 16-bit, big-endian |
Important
Samples must be big-endian. Little-endian samples play as loud noise.
Keep sending 50 packets per second, including during silence. The board never waits for data, so a gap in the stream is a gap in the sound.
A small share of packets, about 2-3%, is discarded on purpose to absorb the clock difference between your PC and the board. This is normal.
Playback is smooth at CIF and SVGA, but can be choppy at UXGA because the lower frame rate feeds the speaker less often.
Changing Camera Settings While Streaming
server.py listens on UDP port 5000 and accepts JSON messages, so you can change the sensor settings while either
stream is running. For example:
{"resolution": [800, 600]}
{"jpeg_quality": 12}
{"brightness": 1, "contrast": -1}
Available settings include brightness, contrast, resolution, horizontal and vertical flip, JPEG quality,
saturation, black and white, exposure and gain controls, white balance, lens correction, special effects and the
colour bar. The full list is the dictionary at the top of lib/server.py.
A Windows GUI for these settings is provided as rsc/WIZ-Cam Configuration Tools.exe.
You can also send a setting from Python on your PC:
import json
import socket

sock = socket.socket(socket.AF_INET, socket.SOCK_DGRAM)
sock.sendto(json.dumps({"jpeg_quality": 12}).encode(), ("<board-ip>", 5000))
Technical Details
The following section
WebREPL
Important
Visit the W55MH32 WebREPL repository to download the source code for this project.
MicroPython WebREPL allows you to connect to and control your device remotely through a web browser.
Use the official MicroPython WebREPL client page to connect to and test your device.
Note
The network interface uses DHCP by default. To use a static IP address instead, open setup.py, update the network configuration values, and set the dhcp parameter to False.
Clone the repository and upload all .py files to the MicroPython device.
Open the terminal in your preferred MicroPython editor and run:
import webrepl_setupFollow the instructions shown in the terminal. After setup is complete, you will be asked whether you want to reboot the device.
If WebREPL on boot is enabled,
webrepl_w55mh32.pywill run automatically after the device restarts.When WebREPL starts successfully, the terminal will display a WebSocket address for connecting to the device.
Open the MicroPython WebREPL client page. Replace the default WebSocket address with the address displayed in the terminal:
ws://IP_ADDRESS:PORTClick Connect and enter the WebREPL password configured during setup.
After the connection is established, the MicroPython REPL prompt should appear in the browser.
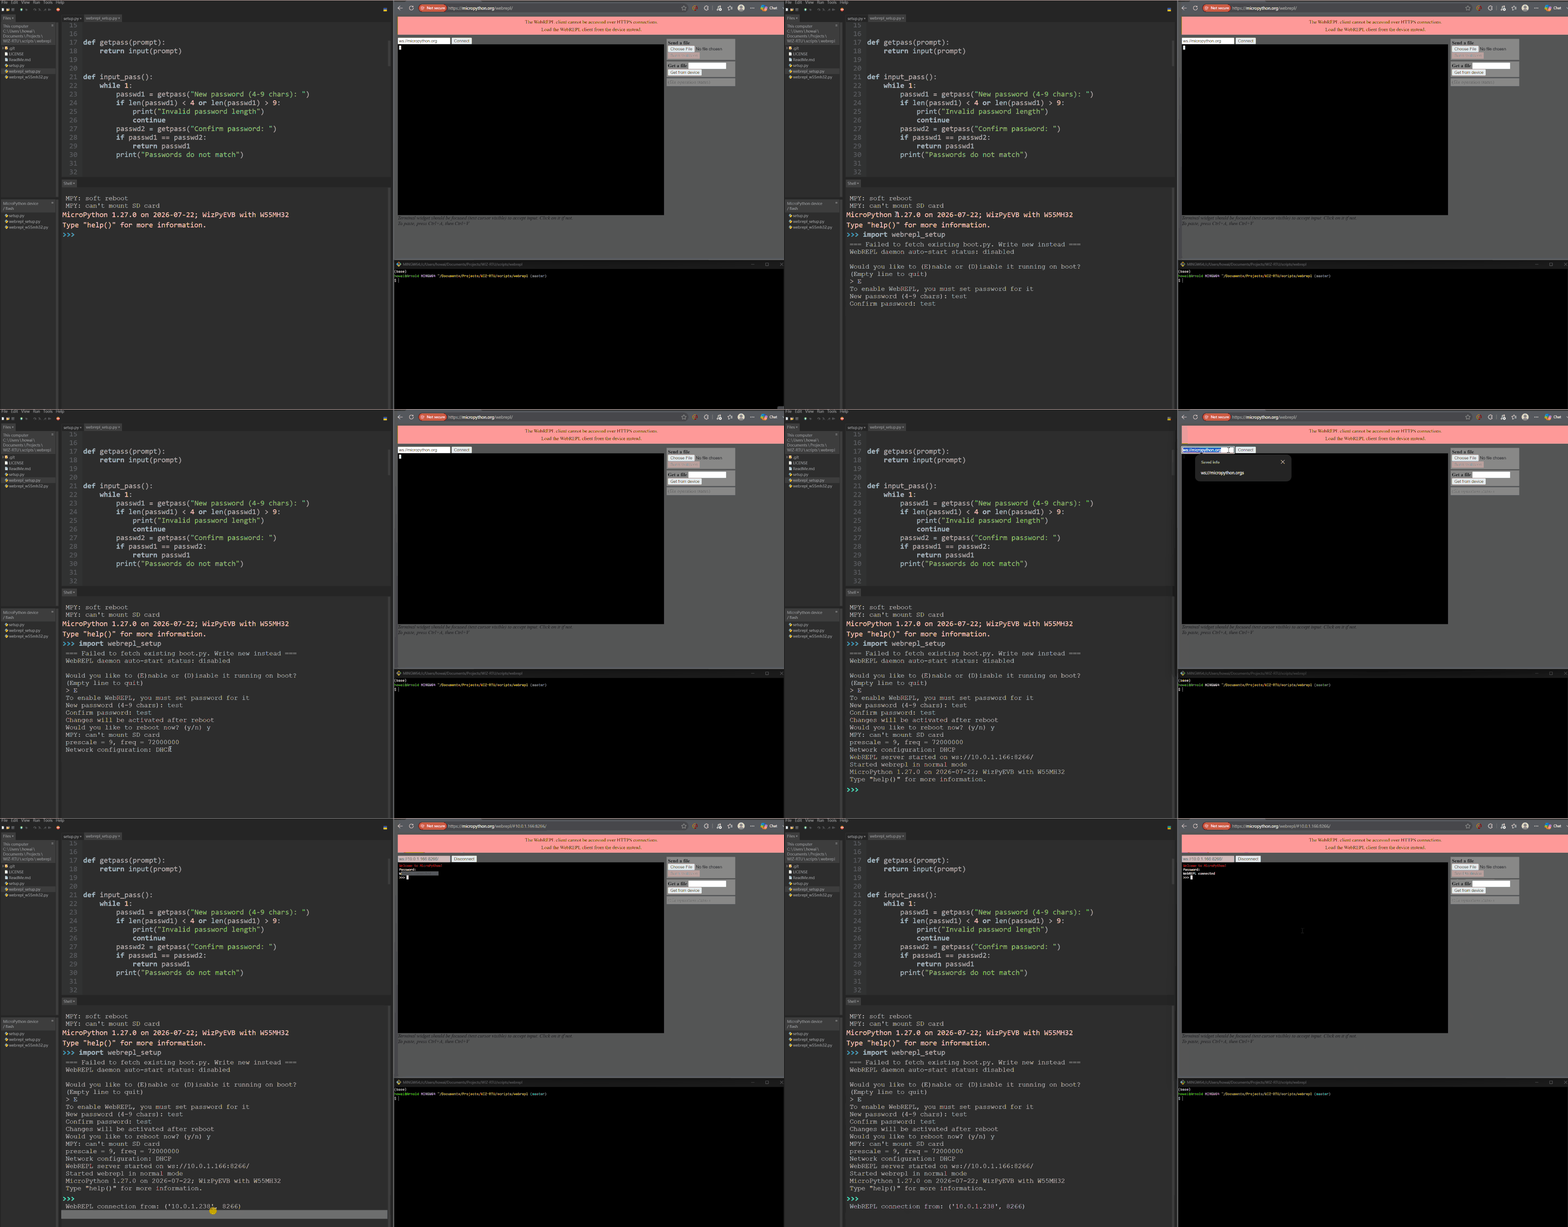
Attention
Some MicroPython editors, such as Thonny, use Raw REPL mode. While Raw REPL is active, commands entered through the browser may not affect the device terminal.
To resolve this issue, close Thonny and reset the board before connecting through WebREPL. Alternatively, use mpremote to monitor and interact with the device.
Monitoring WebREPL with mpremote
mpremote can be used to monitor the device through its USB or serial REPL while testing a WebREPL connection from a browser. This is useful for viewing startup messages, connection attempts, and any errors reported by the board.
Install mpremote
Install mpremote by following the official MicroPython mpremote installation guide.
After installation, start mpremote using the command appropriate for your operating system.
On Linux:mpremote
On Windows:python -m mpremoteIf the board is connected and recognized by your computer,
mpremoteshould automatically connect to its serial REPL.
Note
Remeber to close any Raw-REPL terminal that uses the device.
Keep mpremote open so that you can monitor messages from the device.
Then, on the MicroPython WebREPL page in your browse, test the connection with:
print("Hello, world!")
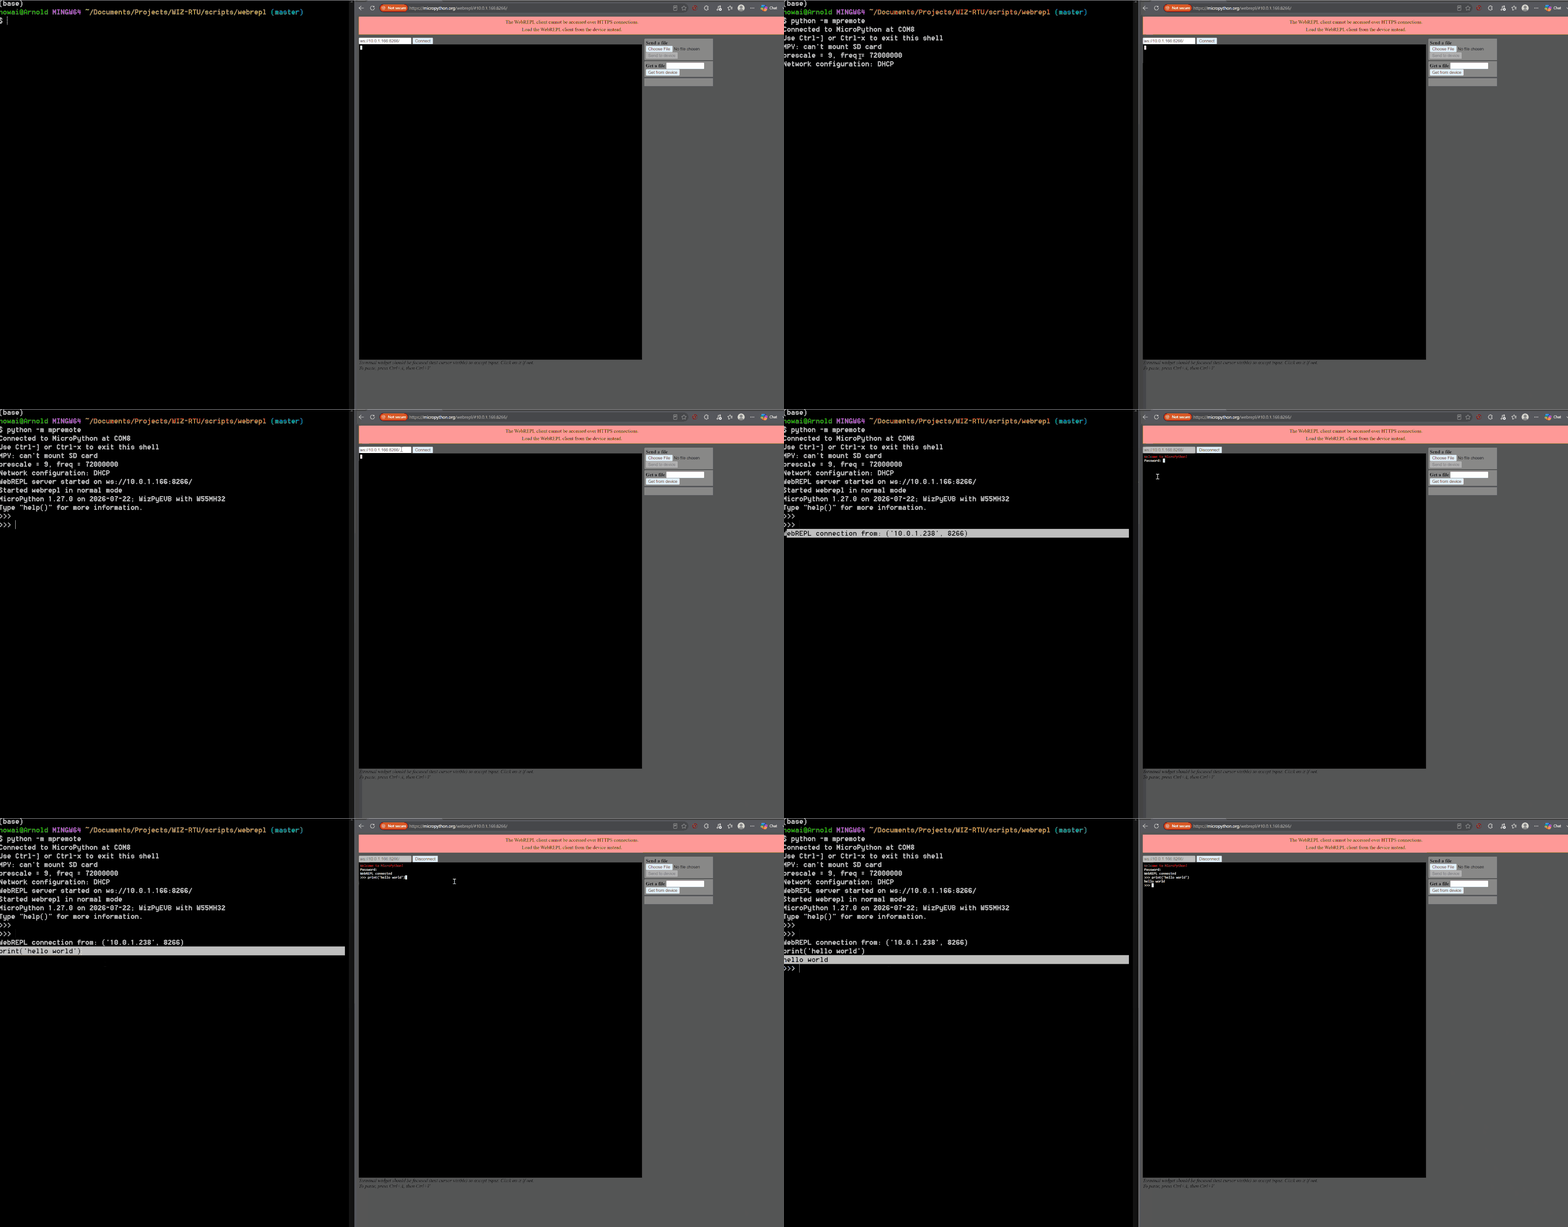
File transfer using WebREPL
WebREPL supports more than remote REPL access. It can also transfer files between the browser and the device.
The WebREPL interface provides two file-transfer operations:
Download a file from the device.
Upload a file to the device.
Important
Avoid modifying or replacing a file while it is being executed by the device. Stop the running program or return to the REPL before transferring application files.
For the following demonstration, I will use Thonny instead of WebREPL, since file transfer works also when Raw REPL is present and it is much more clearer.
Download a File from the Device
Enter the name of the file stored on the device and use the WebREPL download control to save it to your computer.
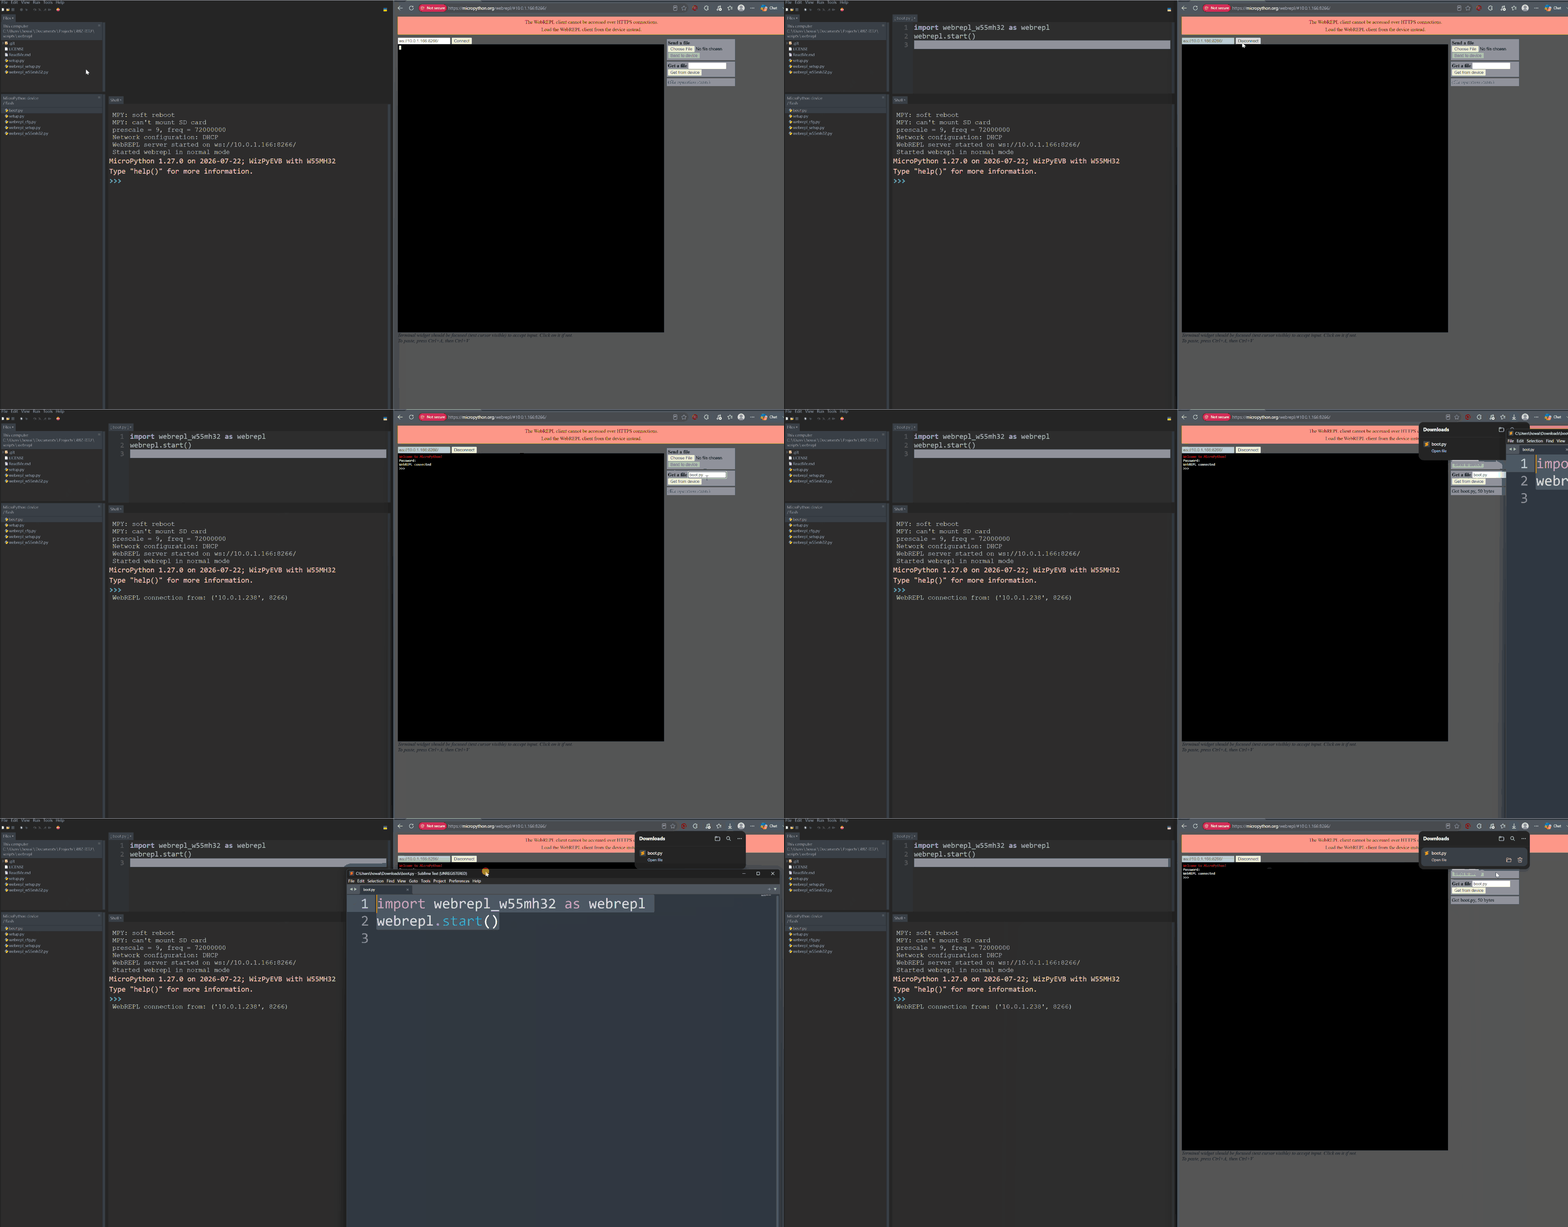
Upload a File to the Device
Select a file from your computer and use the WebREPL upload control to transfer it to the device.
You can also run
import os
os.listdir()
to view if the file appeared in the system.
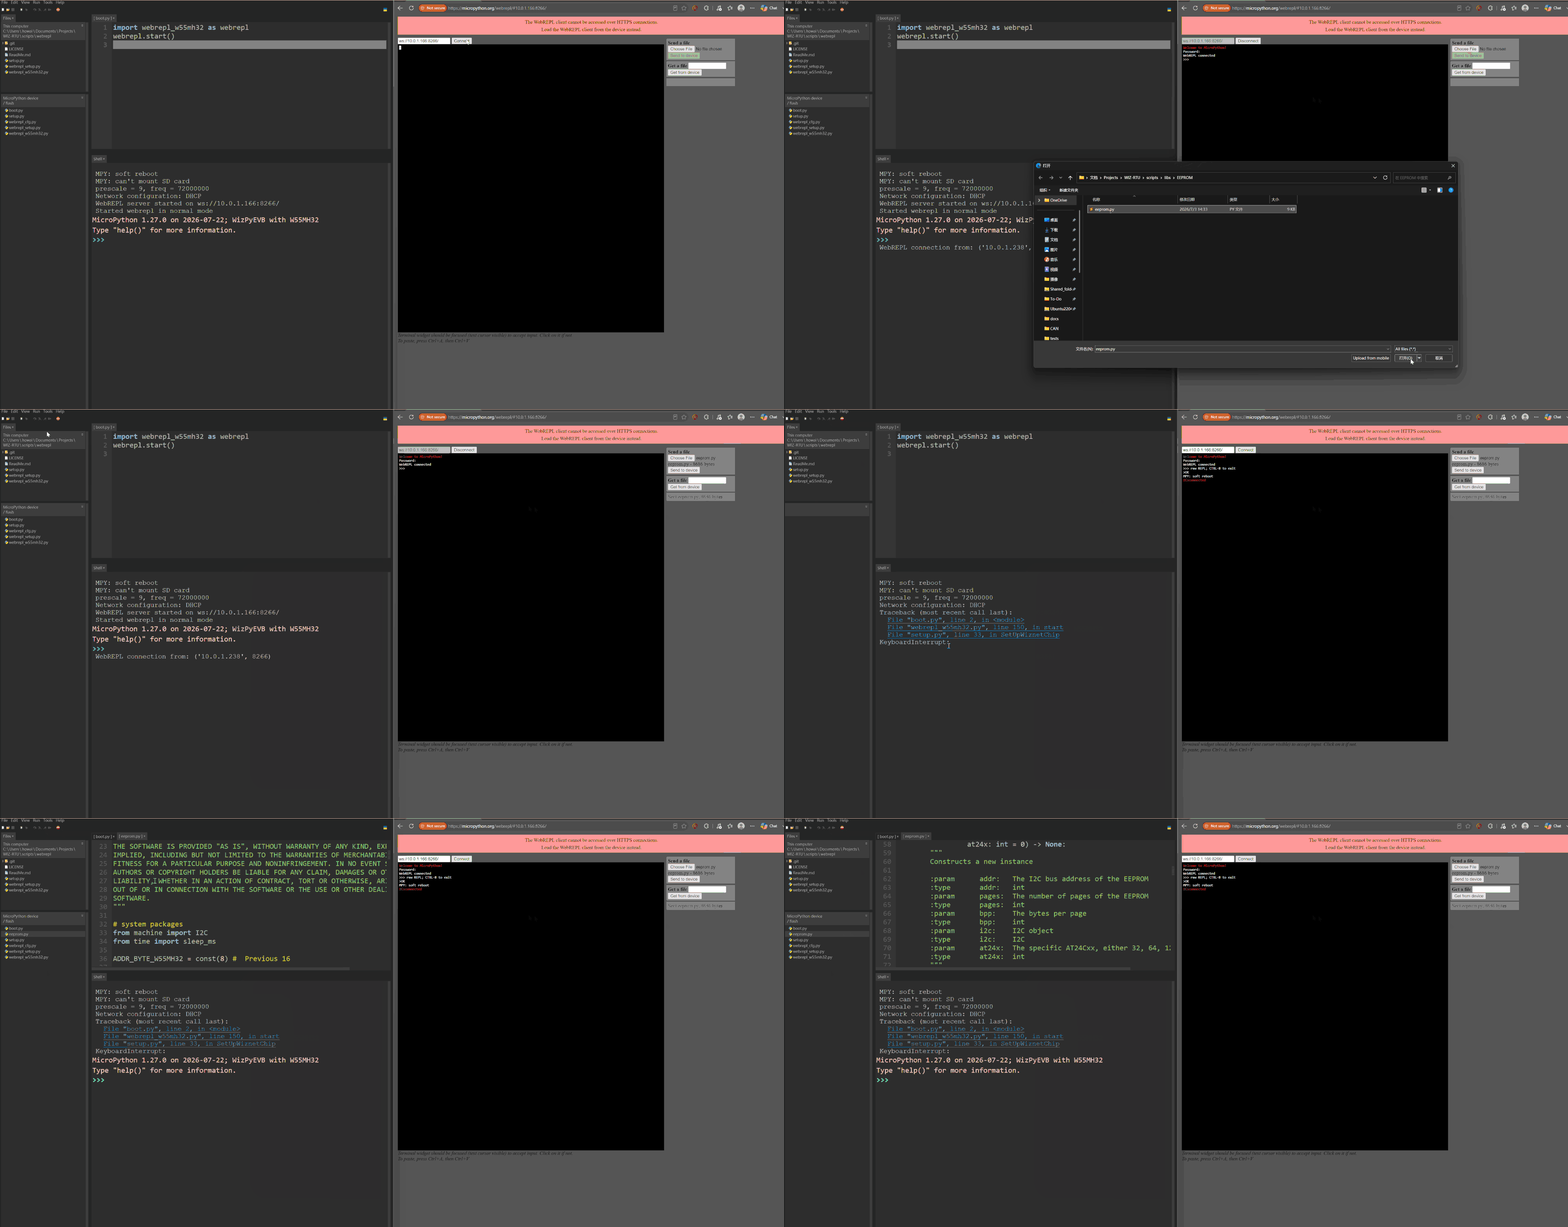
General Board Controls
You can find similar scripts as in W55MH32L-EVB.
Network
See Networking.
Delay and timing
See Delay and timing.
Pins and GPIO
The pins listed in the Pinout section are used by the camera and the audio devices.
Timer
See Timers.
Note
TIM1 is used by the camera capture.
RTC (real time clock)
SPI
See SPI bus
Attention
SPI is not available on the board except for the network interface of the W55MH32 chip.
I2S
See machine.I2S.
Note
I2S3 is used by the microphone and the amplifier, on PB3, PA15 and PB5.